When it comes to manual brew methods, the most elegant of all is the seemingly humble pour over. But when you look closer you can see that these simple devices have a lot of important details, no two are alike. The one constant is that they all look beautiful.
Words by Melanie Winter

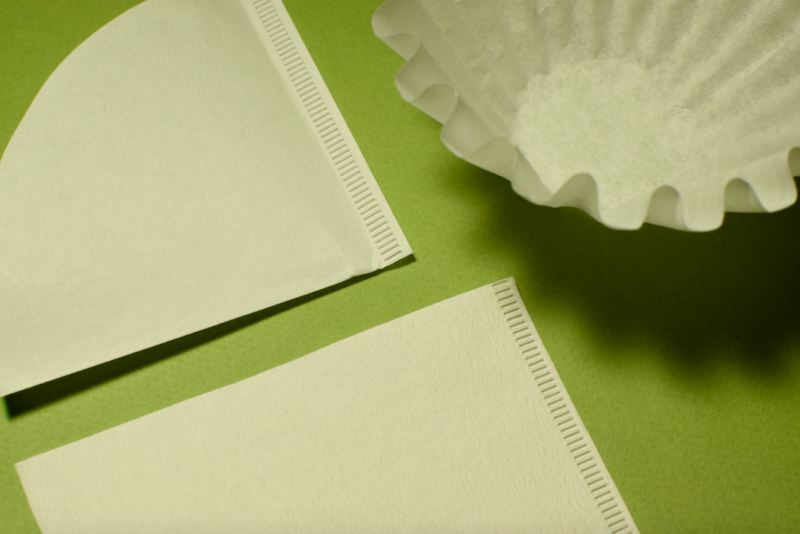
The premise is simple. A cone shaped device is placed over a cup or a carafe. A paper filter is placed inside the cone. Add coffee. Add water. Drink coffee.
And the possibilities are endless.
Before the pour over was created in the early 1900’s by a German woman, Amalie Auguste Melitta Bentz (yes if you’re thinking you’ve heard that name somewhere before, you’re right - Melitta is still a huge coffee company today), coffee was percolated (ground coffee boiled together with water), or brewed under pressure, both of which result in a full bodied cup and in the case of the percolated methods, quite a lot of sediment in the cup.
The idea to brew through, at that stage, a cloth filter, but more commonly these days various forms of paper filters, meant that there was little to no grinds left in the finished brew and it was much ‘lighter’ on flavour due to less contact time between the water and coffee grounds. We know now that lighter doesn’t mean weak, it just means it draws different flavours from the coffee. And with the right know how and a delicious, fresh roasted coffee, that means you can get incredible sweetness and fruits in your cup.
The cone shape that we recognise today came to life in the 1930’s. Over the next century, a number of different variations of the pour over have come into being, each following largely the same shape, but each with their own special distinctions, like the various ridge details of the styles.
There are a few tips that apply when brewing with any of these styles. With almost 100% certainty, coffee professionals will recommend that you rinse your filter papers with hot water, before you add the ground coffee. This simply primes the filter and gets rid of any dry paper flavours that you wouldn’t want to impede the sweetness of your cup.
The blooming step is also pretty universal. This means to add a little bit of your boiled (to the certain temperature recommended by the recipe) water to your coffee grounds just enough to cover them and then waiting for up to 30 seconds. This expands the grounds, making them puff up with bubbles. The scientific reasoning behind this is that on first touch the hot water releases the carbon dioxide that is within each coffee bean.
One of the nice-to-haves (coffee professionals would say necessary-to-haves) in a super cool pour over set up, is the gooseneck kettle. This helps to control both direction and flow rate. As you’re often aiming for an exact amount of water and you need to move the water around the coffee, the gentle pour from the gooseneck helps to achieve this and well, it looks real pretty. It definitely makes you feel like you’re shooting with the best.
The basic drip coffee ratio is 6g/100ml or 1:15 (1g of coffee to 15g of water). But there are countless variations and experiments that you can try with this lovely device.
Alright, now let’s get down to those details of some of the beautiful pour overs on offer.
The Hario V60
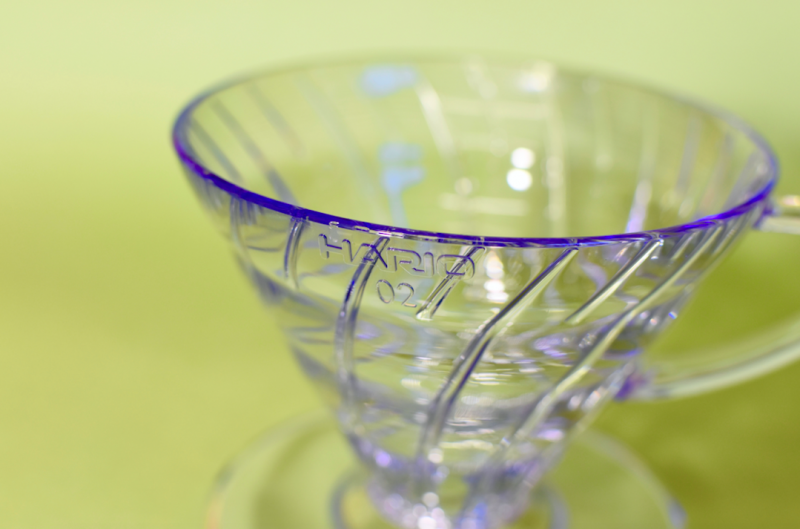
Possibly the most recognisable of all the pour overs. Japanese craftsmanship has staked a big claim in this coffee market sector through various brands, but none more famous than the 60 degree cone from Hario. The elegance and simplicity of the pour over is encapsulated in this brand. Hario is a Japanese coffee company. Founded almost 100 years ago as a heatproof laboratory glassmaker, it ventured into the coffee world in 1948. Their siphon was their first coffee brewer and the V60 as legendary as it has become, was only produced in the early 2000’s after many years of development. The V60 is well-designed and built to last, along with being simple to use and clean. Even better, the coffee you can make with it is delicious, clear, and smooth. You can also choose between five high-quality materials. It has also experienced great success on stage, out of 11 World Cup Brewers Cup Champions in the competition’s history, 6 have used the Hario V60 as their weapon of choice.
Here is the winning recipe from 2017’s winner Chad Wang, that to us proves it doesn’t have to be hyper complicated to make a good recipe. Ok, full disclosure, he was using one of the best coffees in the world to brew, but we can dream.
Ceramic Hario V60
Coffee: Natural Processed Ninety Plus Panama Geisha - try with a Natural processed coffee from your local roastery
Dose: 15g coffee to 250mL of 92°C water
Method: 30 second bloom. After bloom, pour rest of water directly in center of brewer. No circles.
220mL of total beverage. 2:00 total brew time
The Chemex
Having won numerous design awards and a feature in kitchens everywhere from ‘Friends’ to your favourite coffee geeks house, this distinctive cone-and-carafe in one with the signature wooden collar is one of the most famous pour overs. It also has it’s own specially designed filter papers which you have to fold just so to achieve what creator, chemist Dr. Peter Schlumbohm, perceived to be the best brew. Many believe that what makes Chemex coffee so delicious is in fact these proprietary bonded filters. They are specially engineered to be thicker and heavier than normal paper filters which means that they remove a higher proportion of those unwanted components within the coffee. You should find less bitterness and less sediment in a cup of coffee made with them, no matter how strong you brew. For bigger groups, it is a beautiful way to brew and present coffee.
It has come into question in recent years from certain specialty coffee people because of the smooth sides of the cone and what this means for flow rate, but many would argue that it is still one of the best ways of making coffee and also fantastic for making larger volumes than any of the others on the market.
The petal-like ribbing of the Flower Dripper sets it apart from other brewers in its class. The unique rib design gives the grounds more space to expand to maximise blooming.
The other interesting thing about is this company’s attention to their filters, offering three different densities for different styles of coffee. “It is said that taste of coffee is fixed by roasting, but it is not the final goal. To control brewing speed and water temperature are also very important,” says the founder of CAFEC, Shigeji Nakatsuka. As a pioneer of high-quality paper filter, Nakatsuka wanted to find an answer with paper to this question; he continued to study paper construction and at last succeeded to develop three kinds of paper filters to control each proper brewing speed for light-roast, medium-dark roast and dark roast by changing the drying process of paper making. We used the light roast option recently and were delighted with the results.
Impressive clarity of flavour and intense sweetness. If you’re into light roasted coffees and once you’ve played around with your technique, these may be your new go-to pour-over filters.
The Kalita Wave
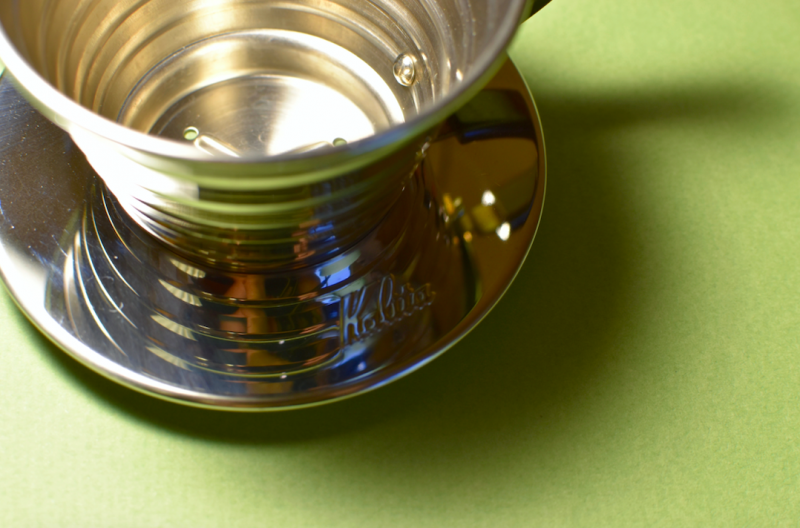
While the Kalita company has been around since the late 1950’s, the Wave is a fairly recent addition to the pour over landscape. The flagship stainless steel device has some major differences to highlight.
The cone leads to a flat bottom with not one but three different holes which is said to help reduce any channeling that might occur. The flat bottomed filter paper has 20 waves that help keep it from sitting against the walls of the brewer. Channeling happens when the beans brew unevenly, and water gets stuck, not passing through the filter as it should. With the three-hole design and the flat bottom, the result is a super crisp, clean cup of coffee. Most pour-over coffee is already fresh and clean tasting, but the evenness of the extraction by the Wave is said to make it that much better.
Bonus: The one cup variety might just be the cutest coffee thing you’ve ever seen.
The Yasukiyo Wooden Dripper
Now, everyone has their favourite. Sometimes that is not entirely dependant on the science, but rather on the sentimental value or the aesthetics. That is certainly true of my personal favourite, which I fell in love with on a trip to Kyoto, Japan, visiting Kurasu Roastery. These spectacular hand-crafted wooden pour overs are rare as the pieces are carved one-by-one by skilled artisans, masters of turning the lathe and carefully applying the blade to manipulate and shape the wood.
The secret of Yamanaka-shikki craftsmanship is tategidori – the way in which the artisans trim the wood used in crafting their wares. Tategidori involves the cutting of wood horizontally, along the grain, rather than the common practice of cutting vertically. This results in a finished product that is far more durable and lasting – a quality that can be appreciated in any century.
One of the ‘It’ Coffee Professionals of the last few years is Patrik Rolf. He opened April Coffee in Copenhagen, Denmark in 2016 and has since been non-stop innovating in the coffee space. One of these innovations is the April Brewer. Certainly the new kid on the pour over block. It comes in ceramic and plastic variations. The plastic is specially designed so that the temperature remains stable while brewing.
What is it unique selling point here? The bottom of the April Brewer features three Filter Holder wedges that hold your flat bottomed paper filter in place. This elevates the filter and allows you to achieve a different flow rate than with other flat-bed brewers. The result is a balanced, transparent, and reliable taste experience. The circular lines along the wall of the brewer allow more air pockets to be formed; enabling more air circulation. This helps brew consistency and enabling a cleaner, more transparent tasting cup.
April Brewer Recipe from the Bluebird Coffee Roastery Crew:
14g in one cup April brewer at 26 clicks on Commandante Grinder (This is quite a coarse grind)
200g of 94C water
Method:
Start your timer. First pour of 100g - 50g circular around the outside of the filter, 50g in the centre of the coffee as if you are aiming for the hole at the centre of the brewer. Make sure to wet all the coffee. This is like an extended bloom. Then at 1min15sec start your second pour of 100g. Same pour structure. This should take around 3min in total.